Build out the workflow#
Though complex, the Dengue repository contains many curated modules that simplify this process, and provide good defaults for many of the steps in the pipeline. Rather than go through each step in detail, we will provide an overview of the workflow and introduce new concepts as necessary.
Steps#
We will approach the workflow by considering the following steps:
Finally we will run the workflow and (briefly) examine some results.
Sequence alignment#
From your AcquireData module drag and connect the ProcessGenbankData, ProcessDengueData and SequenceAlignment modules in order. All of these modules provide a single input and single output each, so there should be no ambiguity in the connections. You should take a moment to read the descriptions provided for each module, which are available by clicking on them. Some modules, like the AcquireData module, provide editable parameters, while others like the SequenceAlignment module do not.

Split genome#
With sequence alignment complete we now want to segregate the E gene and whole genomes and performing quality control. We do this with the SplitGenomaAndQC module, which contains parameters WG Threshold and EG Threshold for the minimum length of the whole genome and E gene respectively. Serotype labels are listed, which default to Dengue_1, Dengue_2, Dengue_3, and Dengue_4. These labels are used to identify the serotype of the sequences in the dataset. This produces EG and WG fasta files for each serotype, which are used in the next step.

Subsample DENV#
The SubsampleDENV module takes the EG and WG fasta files and subsamples them to a specified number of sequences. The SubsampleDENV module contains parameters for the number of sequences to subsample. The SubsampleDENV module produces fasta files for each serotype, along with supporting files which are used in the next step.

Tree building#
Following the subsample step we then proceed with tree-building; however, this first requires cleaning the data output from SubsampleDENV. For this we use a custom Reformatting module, which is a simple R script that removes any sequences with ambiguous nucleotides. The Reformatting module produces fasta files for each serotype, which feed into several downstream modules. Next, add a TreeBuilding module which receives input from the Reformatting module.
Now, we want to infer the time-calibrated trees for each Dengue virus serotype using the TreeTime module, which wraps the TreeTime software package. TreeTime requires fasta and metadata files. The fasta port should receive input from the TreeBuilding module, while the metadata port receives input from the Reformatting module.
Mutation, mugration and translation#
We now want to perform mutation, mugration and translation. This is handled with dedicated modules for each, being careful to ensure that their input and output ports connect to the correct data locations.
The
Mutationsmodule receivedfastainput fromTreeTimeandmetadatainput from theReformattingmodule.The
Mugrationsmodules receives the same inputs, but it’s ports are labelled differently. Mugrations receivestreetimefrom theTreeTimemodule andsubsamplefrom theReformattingmodule.Finally,
Translationreceivestreetimeinputs fromTreeTimeandmutationsinputs fromMutations.
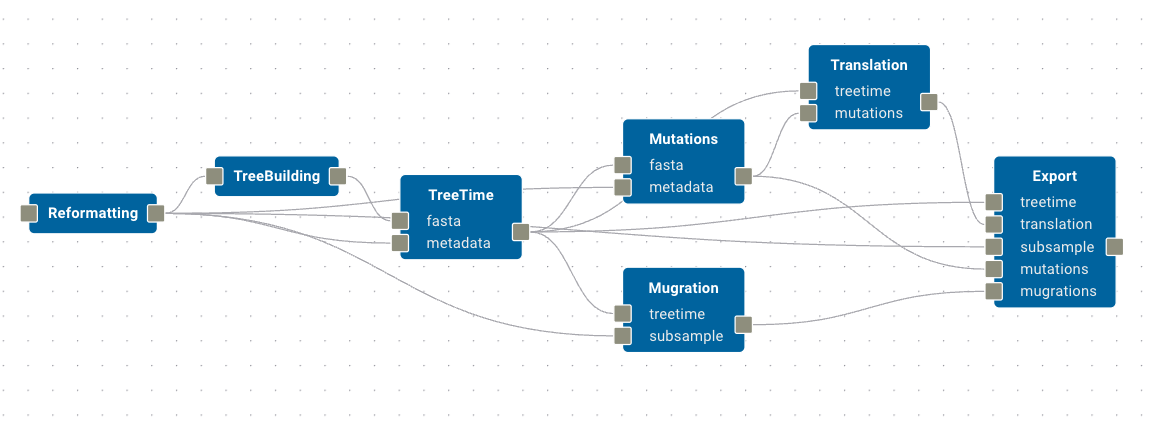
We can actually combine the outputs from these modules into a single Export module, which will collate all of the results into a single output directory. Let’s do this now, mapping the Export module’s treetime, translation, mutations, and mugrations inputs to their corresponding modules, and the subsample input to the Reformatting module.
This section of the workflow should look like this:
Extract and plot#
The final step in the workflow is to extract and plot the results. We begin by connecting Export to a new ExtractPhyloTree module, then connect TreeBreakdown and PlotExportsAndImports in sequence.
The complete workflow should look very similar to this:

Run the workflow#
Click Build & Run then Test Build. If you have not click Delete Test Build then the existing data (and conda environment) from AcquireData will still be present and this step will not need to be re-run. However, all other modules will need to download their environments and startup. This can take some time, so please be patient. Once the build is complete the workflow will launch (you should see progress in the Logs tab; if you encounter any errors, please refer to the Logs tab for more information). When completed, click the Open Results button to be taken to the test build folder where you will find a results directory containing the output of the workflow.
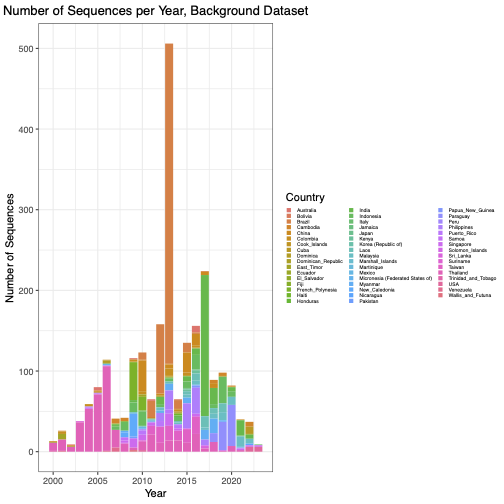
The workflow, when fully run, will produce numerous outputs including fasta, csv and pdf files. For example,we can view the number of sequences per year in the background dataset, shown per country for the DENV4 serotype by opening the file results/subsample_denv/background_metadata_plot_even_denv4.pdf: